Anklet Articles
How To Make Friendship Bracelets
If the idea of making friendship bracelets is difficult, I’m here assist you. From making friendship bracelets when I was a child and creating the same with my own children I’ve probably made hundreds of these. In this article I’ll show you all you should learn about making friendship bracelets. I’ll guide you step-by-step on how to create five different types. They are a range of the difficulty of beginner through advanced therefore there’s something for every person!
Making friendship bracelets can be an enjoyable DIY craft since it’s simple to learn and easy to carry along with you wherever and simple to share with your loved ones. It’s certainly one of the “rites of passage” activities which we all participate in at camp and sleepovers. They also make excellent gifts for your most loved friends!
After you’ve mastered the fundamental techniques, you can check out these easy friendship bracelet designs. From simple braids, to fancy diamond designs There’s no limit to the gorgeous friendship bracelets that you can design!
Table of Contents
Gather Your Supplies
It doesn’t take much to start making some fun friendship bracelets. All you require is embroidery floss and something to keep the bracelet in place while you tie the knots. These are the most popular, tried and true items:
- thread or string
- Safety pin, clipboard or masking tape
- letter beads or charms (optional)
For a simpler time for yourself, buy a useful friend bracelet.
Friendship Bracelets String
The ideal string to make friendship bracelets is known as embroidery floss. It is a soft 6-stranded string of cotton with an ethereal sparkle. It is available in an vast array of colors and styles, including neons and metallics.
Start with the four basic Knots
Even the most elegant necklaces of friendship can be tied using the same knots.
It is recommended to learn four fundamental knots on friendship bracelets that you must be able to. When you’ve mastered the right knots then you’ll be able to create and design your personal friendship bracelets in no time.
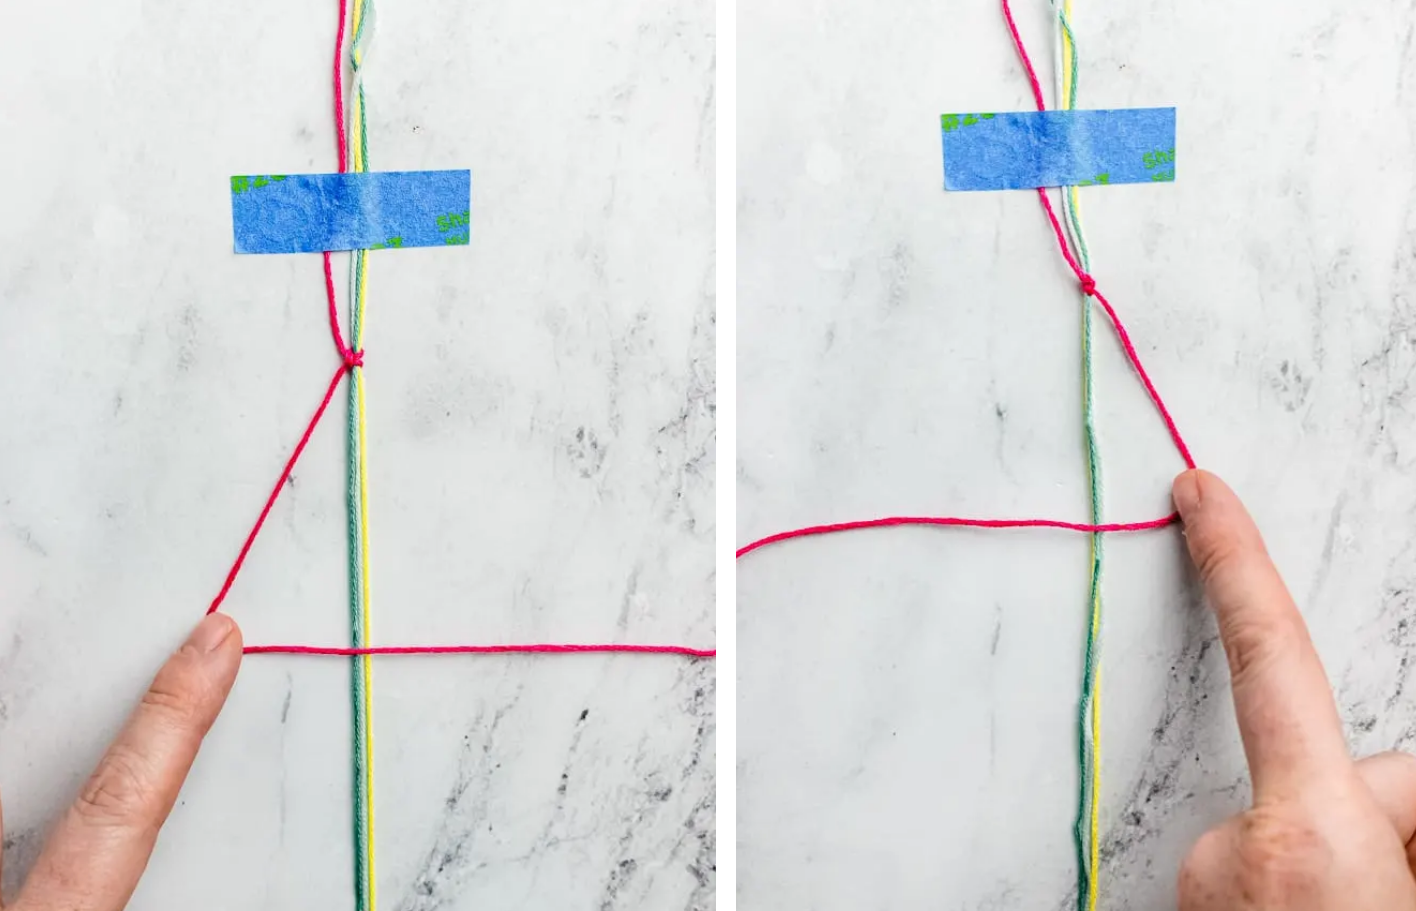
The knots consists by two halves, also known as half-hitches. The four most basic friendship bracelet knots make use of two half-hitches, stacked in various combinations.
- Forward knot: forward hitch + forward hitch
- Backward knot: backward hitch + backward hitch
- Forward-Backward knot: forward hitch + backward hitch
- Backward-Forward knot: backward hitch + forward hitch
Here is a related video to view
Bracelets: Common Questions
Here are a few frequently -asked questions (FAQs) regarding the making of friendship bracelets.
How long is the appropriate length of thread to make a bracelet for friendship?
For typical bracelets that are available, each string should begin with a length of 36′. When you’ve got two strings of each color, you could start with one which is 72” long, then divide it, creating two pieces that measure 36 inches.
If you’ve got an arrangement that uses one color in greater quantities than others, the string needs to be cut in a longer length.
What should you do if have run short of strings?
If you have a problem with strings in the middle of the bracelet, you are able to connect more strings.
Connect the extension string to the shorter string using an asymmetrical knot. To protect yourself you can dab some superglue on the knot. It’s okay to leave the pieces that are at the end sticking out.
Continue to work in the same pattern. Make sure to keep the loose ends to the back of your creation. Once you’re finished making your bracelet fix them with super glue or cut them off.
Why is my bracelet filled with holes?
When you are first beginning to make bracelets, it is difficult to achieve the perfect tension.
If the tension has become too loose the bracelet may have holes between knots. (On the contrary, if the tension is not tight enough, knots could be flipped to the wrong color!)
When knotting make sure you secure the new knot on top of the previous row. In this instance practicing is the best way to become perfect.
What is the reason my bracelet is curling up?
There are several possibilities for what could be happening. Make sure that you’re making two half-hitches in each knot. If you don’t the bracelet could become curlier.
Perhaps it’s that the knot is just too tight. Try to make the knots a less loose.
It’s also important to be aware that certain patterns, such as that of Candy Stripe pattern are more prone to curl.
What is the best way to flatten curly friendship bracelets?
One method for straightening friendship bracelets is to cover them by soaking them in water. Make sure your bracelet is slightly damp and place it between two paper towels and allow it to dry under an enormous book.
It is also possible to iron the bracelet using a clothes iron or hair straightener. Before trying this, make sure the thread you’re using is 100 100% cotton!


